- Introduction
- Learn
 Try It
- Task
Try It

Wave on a String
Open the interactive Wave on a String and follow the directions below.
There are a few questions included in the list. Answer them in your notebook while you complete the interactive. Then, progress to the next tab to check your answers.
Directions:
- In manual mode, set the tension to high and the damping to 50. Wiggle the wrench up and down several times. Make note of what happens to the wave.
- Decrease the damping to 25 and leave the tension on high. Wiggle the wrench several times. Make note of what happens to the wave.
- Reduce the tension to 3/4 leaving the other values the same. Wiggle the wrench several times. Make note of what happens to the wave.
- Reduce the tension to 1/2 leaving the other values the same. Wiggle the wrench several times. Make note of what happens to the wave.
- Reduce the tension to 1/4 leaving the other values the same. Wiggle the wrench several times. Make note of what happens to the wave.
- Question: How did the wave change as you decreased the tension and damping?
- Change the wave to Oscillate. Set the amplitude at 50, frequency at 50, damping at 50, and tension on high. Make note of what happens to the wave.
- Increase the amplitude, leaving the other variables the same as before. Make note of what happens to the wave.
- Increase frequency, leaving the other variables the same as before. Make note of what happens to the wave.
- Manipulate the variables one at a time. Restart each time you change a variable. Change the end from “fixed” to “loose” to “no.” Make note of what happens to the wave after each change.
- Question: How did the wave change as you decreased the variables?
- Question: How did the wave change as you increased the variables?
- Question: How did the wave change after changing the type of end?
Answers to Wave on a String Interactive
Question 6 Answer:
The beads of the wave moved around with less and less consistency. The wave was difficult to recognize.
Question 11 Answer:
Decreasing the amplitude decreases the height of the wave. Decreasing the frequency slows the wave down. Decreasing the damping increased the amplitude and the frequency of the wave.
Question 12 Answer:
Increasing the amplitude increases the height of the wave. Increasing the frequency speeds up the wave. Increasing the damping gradually decreases the amplitude and frequency of the wave.
Question 13 Answer:
The loose end moves up and down. The height of the end is dependent on the other variables. When there is no end, the wave moves along the string and appears to continue moving out of sight.
Labeling Waves
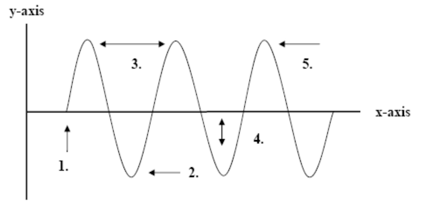
In your notebook, draw the transverse wave and the longitudinal wave shown below. Label the parts of each wave using the provided vocabulary. Then, progress to the next tab to check your answers.
- Label the parts of a transverse wave using the following terms:
- Wavelength
- Crest
- Trough
- Rest point
- Amplitude
- Label the parts of a longitudinal wave using the following terms:
- Rarefaction
- compression