Learn
Force Diagrams and Friction
Now, let's look back at the force diagrams you learned to draw in the previous lesson and examine how friction affects these diagrams more closely.
Below is the completed force diagram:
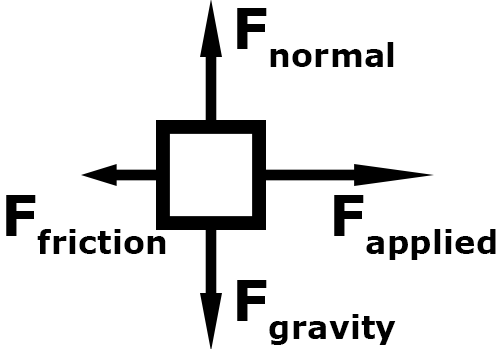
Here is how we created the diagram:
- Let's go back to our common example of a book sliding on a desk. We draw a box on a line to represent the book on the desk.
- Let's go ahead and add the two forces which are almost always present for objects like this: gravity and the normal forceforce opposing gravity .We draw an arrow down to represent gravity and label it Fg. Then we draw an arrow of the exact same size pointing up and label it Fn. These two arrows are the same size because the forces are balanced.
- Now, we are going show a push on the book which slides the book to the right. To represent the push on the book, we draw an arrow to the right and label it Fa for applied force.
- Remember friction opposes the motion of an object when two surfaces are in contact. Therefore, we must add a friction arrow going in the opposite direction of the applied force and label it Ff.
Since the book is moving to the right, the Fa arrow is longer than the friction arrow in this example to represent unbalanced forces and the motion of the book.