Learn
Tree Species
The first decision to made is which species to plant. Selecting the proper tree species is an extremely important decision. These are the important things to consider in selecting the tree species to plant:
- landowner objectives,
- climate,
- soil type,
- susceptibility to disease and pest problems,
- site conditions,
- market influences,
- planting site, and
- geographic location.
Maximum growth and yield are possible only if the right species are selected for the particular planting site and geographic location. Planting the wrong species on a site can result in low survival and growth and little product yield. Retaining a professional forester will help assure that you receive accurate, up-to-date information.
Landowner Objectives
Landowner objectives will have a direct influence on species selection. Landowners may consider any number of objectives. Some of these may include:
- timber production
- recreation
- wildlife
- restoration
- or something else
Whatever the landowners objective may be, it should be specified in a forest management plan and determined long before a forest regeneration is planned.
Planting
Tree species, seed source, and genotypes are the most important considerations for planting. Planting with containerized seedlings may begin in the fall and proceed through the winter. Bareroot seedlings are planted only during winter months. Seedlings must be properly transported, stored, handled, and planted to ensure overall regeneration success. Follow up monitoring is needed to evaluate success of the operation. Planting occurs most often for pine regeneration. Hardwood establishment is most often achieved through natural regeneration, although some may occur through planting or direct seeding. Hardwood plantings occur most often for reasons other than economic.
Watch Planting to see tree planting in action.
Pine Planting Considerations
Container versus bareroot – Species selected for planting may dictate whether bareroot or containerized seedlings are chosen.
Contractor – A good contractor makes sure that seedlings are handled and planted properly.
Disease and pests – Risk factors must be considered and plans taken to reduce risk.
Landowner objectives – Objectives may include timber production, recreation, wildlife, restoration, and aesthetics.
Ordering – Orders for seedlings should be placed well in advance to ensure availability.
Seedling transportation and handling – Seedlings should be handled with care and protected from direct sun, wind, and temperature extremes.
Stock selection – Selection of proper tree species is based on landowner objectives, climate, soil type, susceptibility to disease/pest problems, site conditions, and market influences. It is important to plant the right tree in the right place for proper survival, growth, and future product yield.
Timing – Best growth and survival occurs when seedlings are planted in moist soils early in the fall-winter. Planting during periods of high temperatures and low humidity can mean lower survival.
Seedlings
Seedlings are living trees that can die if they are not taken care of properly during transport and planting. Bareroot pine seedlings shipped from the nursery are commonly packaged in open-end bales, kraft-polyethylene lined (K-P) bags, or wax-coated boxes. Container seedlings are usually packaged in wax-coated boxes. When treated with care, these packages help protect seedling quality during transport and storage.
Transporting Seedlings
Arrange to pick up seedlings in the late afternoon and schedule long-distance hauling at night to minimize heat buildup. If an open truck or trailer is used, a tarp can shade the seedlings, but be sure to allow for ventilation under the tarp and around the seedlings to prevent heat buildup. To prevent water loss from open-end bales, avoid exposing the bales to wind during transport. Avoid stacking bales or bags of seedlings over two high without providing space between packages for air circulation and support to prevent crushing.
Seedling Storage
Since most landowners do not have access to cold-storage facilities, it is best if seedlings can be planted immediately. If they cannot, seedlings should be stored in a building where they can be protected from direct sun, wind, and temperature extremes. Baled seedlings should be lightly watered every 2 to 3 days, but make sure to drain excess water from the bales. When transporting seedlings to the planting site, take only as many as can be planted in a day, unless cold storage facilities are available. Seedling quality deteriorates quickly with careless field storage and handling. Always provide a shaded storage area.
Planting
Now that the time has arrived to plant, one of two methods may be used: machine or hand planting. With machine planting, a tractor-pulled machine that has a coulter for slicing through the soil, a trencher that opens the soil, and a packing wheel that closes the opening is used. The machine planter production is between 7,000 and 9,000 seedlings per day. If hand planting is chosen, the individuals or planting crews using hand tools plant the seedlings. Hand planters can plant between 600 and 1,500 seedlings per day. Based on site conditions, fertilization at planting may be done to improve early seedling growth.
Factors Influencing Success
Several factors influence whether or not planting is a success. These include:
Planting quality – This should be assessed throughout planting operation to make sure seedlings are planted to proper depth, vertical position, and soil packed.
Survival and stocking – Both are important factors in evaluating success of planting efforts.
- Survival is percent of planting seedlings alive and is usually measured at the end of the first growing season.
- Stocking refers to number and distribution of living seedlings over the planation
Replanting - May be done in areas of low survival or stocking.
Watch Planting Seedlings to learn more about the process of planting tree seedlings.
Open Planting Seedlings in a new tab
Reforestation Tools
Let's take a look at some of the tools used in artificial reforestation.
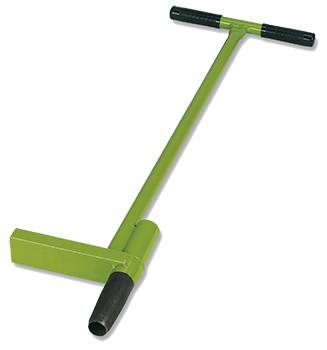
Speedy Dibble: A tool designed for fast and easy tree planting.
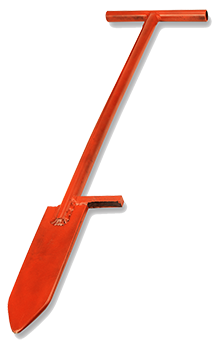
Container Seedling Dibble: A dibble with a hallow tip that allows for the removal of a solid core from the ground.
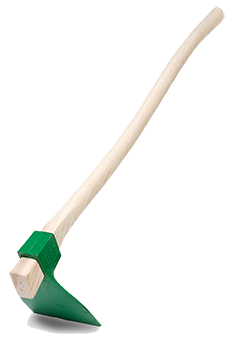
Hoedad: A hoe used for planting seedlings.
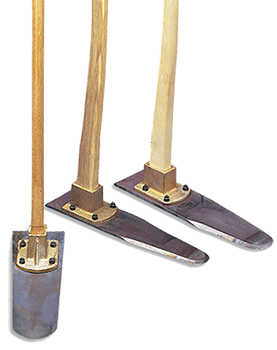
Scalping Hoe: A tool used to remove the top layer of vegetation and soil that may hinder the planting and survival of seedlings.
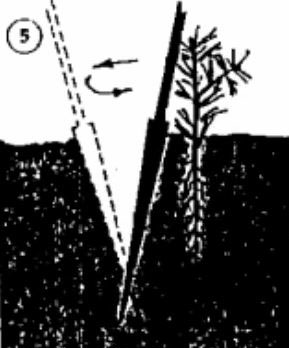
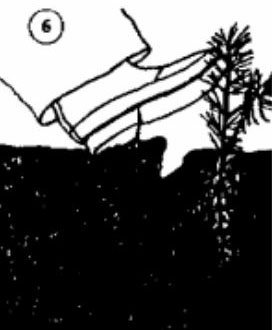
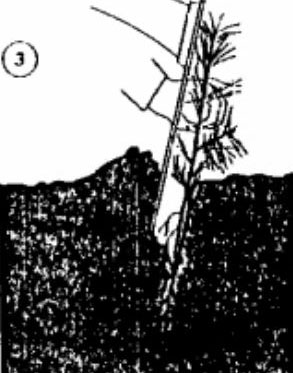
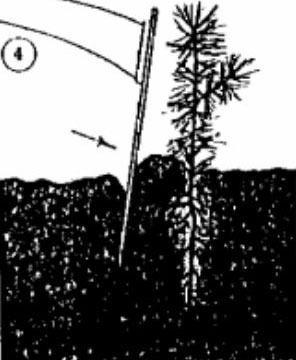
Dibble Planting Instructions
Following these instructions when planting bareroot seedlings with a dibble:
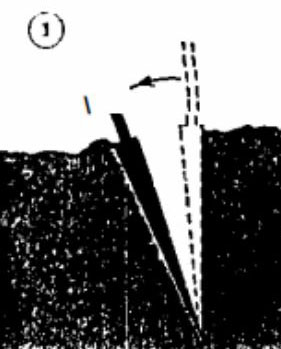
Step 1: Insert the dibble straight down into the soil to the full depth of the blade (8"-10") and pull back on the handle to open the planting hole. DO NOT rock the dibble back and forth as this causes soil in the planting hole to be compacted, inhibiting root growth.
Step 2: Remove the dibble and push the seedling roots deep into the planting hole. Pull the seedling back up to the correct planting depth. Gently shake the seedling to allow the roots to straighten out. DO NOT twist or spin the seedling or leave the roots J-rooted.
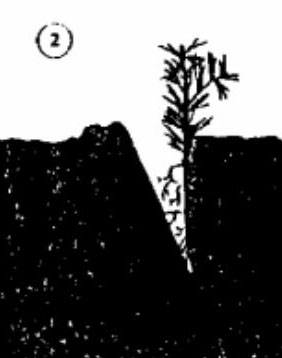
Step 3: Insert dibble behind seedling and twist it to help hold the seedling in place and close the top of the planting slit.
Step 4: Push the dibble down to the full depth of the blade.
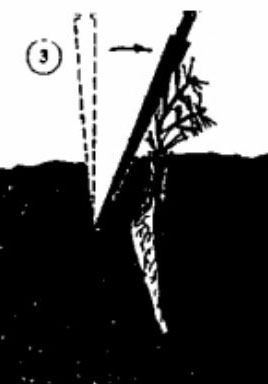
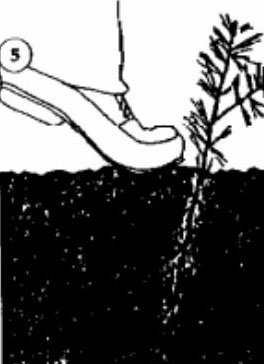
Step 5: Pull back on the handle to close the bottom of the planting slit. Then push forward to close the top, eliminating air pockets around the root.
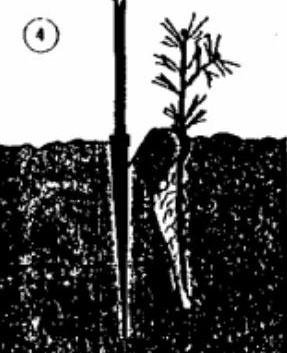
Step 6: Remove the dibble and close and firm up the opening with heel.
Hoedad Planting Instructions
Following these instructions when planting bareroot seedlings with a hoedad:
Step 1: Strike blade almost vertically, full depth of the blade (8 -10"), into the soil. Pull up on the handle to break the soil loose at the bottom of the hole.
Step 2: Slide hand down handle almost to blade. Pull back and down on the handle to form a pocket on far side of blade. With the other hand, immediately roll the seedling roots into the pocket to the full depth of the hole.
Step 3: Hold seedling in place while sliding the hoedad blade out of the hole. Loose soil should fall into the hole holding the seedling in place.
Step 4: Pull blade completely out of the hole and push soil against planted tree with the tip of the blade.
Step 5: Use foot to firm the soil against the seedling. Do not step on or bruise seedling with your foot.


Silviculture
Watch Silviculture for an overview of the tree planting process.