Learn
Firearms
Types of Guns
Different types of guns will fire bullets with different amounts of energy. This is because the chambers within these guns are designed to withstand differing amounts of pressure. In this unit, we will focus mainly on two types of guns: handguns and rifles.
Handgun Overview
Handguns were conceived as a compact weapon for self-defense. They are typically small, making them easy to conceal. They are designed for shooting at closer range, fire with less energy, and are less accurate than a rifle.
A revolver is a type of handgun that has a hammer that pulls back when the trigger is pulled or can be pulled back manually. Bullets rotate in the cylinder to bring one to the barrel.
Revolver
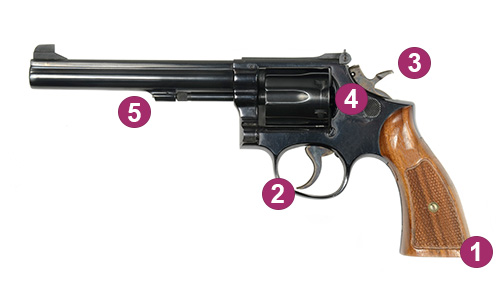
Parts of a Revolver:
- Grip
- Trigger - When pulled, the trigger releases the hammer.
- Hammer - The hammer contacts the bullet primer. This ignites the propellant and drives the bullet down the barrel.
- Cylinder - The cylinder holds the bullets and rotates after firing so that a new bullet is available.
- Barrel - The barrel is rifled, or lined with spiraling grooves, which makes the bullet spin and gives it stability as it exits the muzzle.

Rifling pattern typically used inside the barrel of a handgun.
Semiautomatic Handgun Overview
A semiautomatic handgun holds more ammunition than a revolver. The bullets are housed in a magazine, located inside the grip. The hammer strikes the bullet case when the trigger is pulled. The bullet casing is automatically ejected, and a new bullet is pushed upwards.
Semiautomatic Handgun
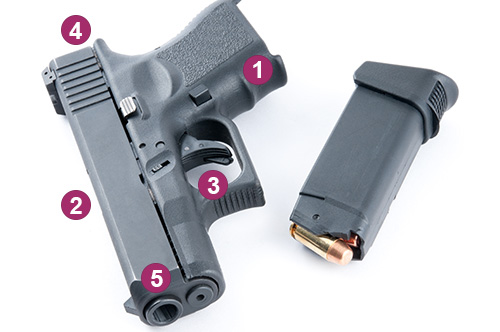
Parts of a Semiautomatic Handgun:
- Grip - A magazine (the rectangular case with bullets inside) located inside the grip holds the bullets.
- Slide - This portion slides back, releasing a bullet from the magazine and pushes it forward into the chamber.
- Trigger - The trigger causes the hammer to pull back and strike the bullet.
- Hammer - The hammer contacts the bullet primer. This ignites the propellant and drives the bullet down the barrel.
- Barrel - The barrel is rifled, or lined with spiraling grooves, which makes the bullet spin and gives it stability as it exits the muzzle.
Rifles Overview
A rifle fires a bullet like a handgun. The hammer strikes a bullet case when the trigger is pulled. The bullet casing can be manually or automatically ejected. Due to the longer barrel, which can withstand greater pressure and allow more time for the pressure to build, rifles fire with more energy than handguns. They are designed for longer distance shots, such as hunting wild game, and are more accurate than handguns.
Rifle
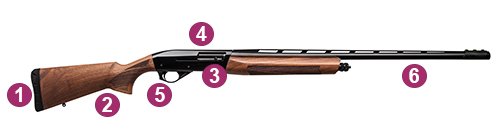
Parts of a Rifle:
- Butt - Because they fire with more energy than a handgun, there is also more recoil kickback . The butt of the rifle has a large area to distribute the energy, typically into the shoulder of the shooter.
- Stock - The stock helps the shooter to establish stability, aim properly and counter the recoil once the shot is fired.
- Safety - The safety lock controls the movement of the trigger. When the safety is on, the gun will not fire.
- Chamber - The chamber holds the round ready for shooting.
- Trigger - The trigger releases the hammer, which strikes the bullet.
- Barrel - The barrel is rifled. The longer barrel lengths increase the accuracy of the rifle.
Knowledge Check #1
Determine whether the following descriptions apply to a handgun, rifle, or both.
Descriptions:
- rifled barrel
- hard to conceal
- designed for close-range shots
- less accurate
- designed for longer-range shots
- grip used for stability
- shorter barrel
- hammer strikes bullet
- more accurate
- longer barrel
- stock used for stability
- easy to conceal
Categories:
- Handgun
- Rifle
- Both
Answer:
- Handgun
- designed for close-range shots
- less accurate
- grip used for stability
- shorter barrel
- easy to conceal
- Rifle
- hard to conceal
- designed for longer-range shots
- more accurate
- longer barrel
- stock used for stability
- Both
- rifled barrel
- hammer strikes bullet
Ballistics
Ballistics is the science of how a projectile, such as a bullet, travels in flight. This includes its path down the barrel (internal ballistics) as well as through the air (external ballistics) and into the target (terminal ballistics).
Knowledge of the three portions of the bullet's trajectory along with evidence collected at the scene can allow investigators to trace the path of the bullet.
Clues at the Scene: Spent Cartridges
The first necessity at a shooting scene is to locate and record the location of all spent cartridges. Foot traffic should be banned from the area until they are located. Spent casings should be well photographed and marked. Each spent casing should be included on the sketch and its location noted via triangulation.
The physical location of these casings may give clues as to the location of the shooter and the direction of shots fired.
Found Weapons
If any weapons are found, they should also be photographed and marked on the sketch.
Investigators should avoid touching collected weapons and cartridges as they may contain fingerprints or other trace evidence. Weapons should be picked up on the trigger guard or the checkered portion of the grip, using gloved hands. These areas rarely contain useful fingerprints.
Clues at the Scene: Bullet Holes
The overall trajectory of a bullet can be determined if two reference points (bullet holes) can be located—this may be a door and a window, an entry and exit wound, or a two-sided door.
To determine the trajectory of a bullet, investigators will use the following tools:
- String
- Rods
- Tape
- Measuring Tape
- Protractor
- Level
- Inclinometer (determines angles)
- Compass
- Marking Pens
- Laser Pointers
Establishing a Path
Fiberglass rods are inserted into bullet holes to establish the path. Prior to inserting the rods, the direction of the bullet is determined, and gunpowder residue is collected from around the bullet holes. Once the rods are inserted, a string is then attached to continue the path, which can be confirmed with a laser beam. Once the strings are in place and measurements have been made of distance and angles, the result is photographed from various locations, including a photo from above using a ladder, and diagrammed.
Tools of the Trade
Watch the video Tools of the Trade: Laser Trajectory Kit from 3:12 to 3:58.
Open Tools of the Trade: Laser Trajectory Kit in a new window
Note: The presentation may take a moment to load.
Determining the Shooter's Position
Strings are then stretched from the impact site toward the origination of the bullet. The shooter's relative position and distance can often be determined from this test.
If a victim is involved, a physical examination of the victim, including x-rays can reveal the path of the projectile. This can aid in angle determination unless the bullet is deflected by bone material.
Problems
String is commonly used to determine the path of a projectile. However, string can droop. The longer the path of the projectile, the more likely it is to droop.
Laser beams travel in a straight line and do not experience droop. However, they are difficult to see in the daylight and must be held. The holder, whether a person or tripod, may be unsteady in windy conditions.
The angle of measurement can change over time due to conditions such as tire pressure or whether the vehicle was sitting on an incline. These factors should be taken into consideration when forming conclusions.
Knowledge Check #2
Using knowledge of ballistics, investigators can determine:
- The exact location from which a bullet was fired.
- An approximate location from which a bullet was fired.
- Whether the shooter was male or female.
Answer: b. An approximate location from which a bullet was fired.
Example Calculation
Shots were fired at a vehicle from a nearby building. The bullet came through the windshield and entered the passenger seat, which was empty. Using rods, investigators determined that the angle of the shooter above the vehicle was 3 degrees. See how investigators use this information to determine the height of the shooter.
Step 1
The building was measured to be 50 feet from the vehicle at the time of impact. The angle of the shot is 3 degrees. The distance between the shooter and vehicle (a line parallel to the ground) is 50 feet. The distance from the impact to the ground is 3 feet. The height of the shooter above the line of injury is unknown.
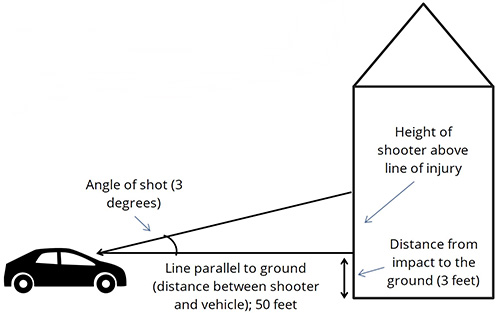
Step 2
A right triangle has been formed, allowing us to use trigonometry principles to determine the height of the shooter.
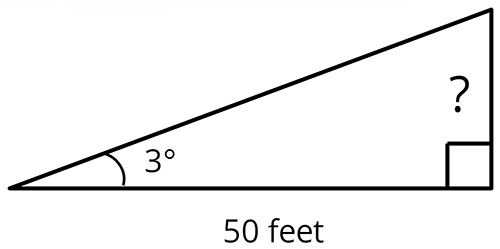
We will use the trig function tangent which is equal to the length of the opposite side of the triangle divided by the adjacent side of the triangle.
In this case, our angle is 3°. The length of the opposite side of the triangle is unknown (x) while the length of the adjacent side is 50 feet.
Step 3
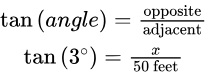
We can solve for x by multiplying both sides by 50 feet.
Tan (3°) * 50 feet = x
Using a calculator or trig table to find Tan (3°) and multiplying by 50 feet gives us the height of the shooter above the car.
2.62 feet = x
Step 4
Note this is the height above the point of impact, not the actual height.
The distance from the point of impact to the ground was measured to be 3 feet. Adding these two values together can tell investigators the height from which the bullet was fired.
2.62 feet + 3 feet = 5.62 feet
While this value should not be taken as the exact height from which the bullet was fired, it gives investigators an idea that the shooter is either someone tall (taller than 5.62 feet) or was standing on an elevated surface inside the building when firing the shot.
Knowledge Check #3
A bicyclist was struck in the head by a bullet when riding his bike. Bullet holes in the helmet allowed investigators to calculate the angle of elevation of the shooter to be about 7.5 degrees. The distance to the building from which the shot was fired was 142 feet. The victim was 6 feet above the ground when upon on his bike. How far was the shooter above the ground when the shot was fired?
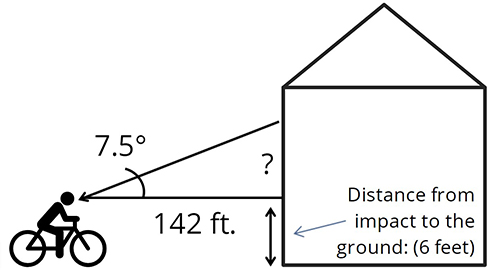
- 18.7 feet
- 18.9 feet
- 24.7 feet
- 178 feet
Answer: c. 24.7 feet.
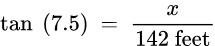
x = 18.7 feet
Height of shooter = 18.7 feet + 6 feet
Gunshot Residue
Gunshot residue can give clues as to the distance from which a shot was fired as well as whether a particular suspect fired the shot.
Open Distance Determination from the Alabama Department of Forensic Sciences to see example gunshot residue patterns from different distances.
Gunshot Residue Evidence
When a gun is fired, it propels residue both outward toward the target and back toward the shooter, leaving trace amounts of gunshot residue on the shooter's hands and clothing as well as nearby surfaces. These trace amounts can help to identify the shooter and his or her location. These powders are difficult to wash off and can remain on clothing for several days.

Gunshot Residue Components
Gunshot residues consists of burned and unburned gunpowder along with lead, barium, and antimony. The exact components of the gunpowder residue differ depending on the type of bullet used and its manufacturer. Researchers are working on a new technique that would be able to identify the components of the gunshot residue in such a way as to identify the type and brand of bullet from which they originated.
Forensic Science Gunpowder Residue
Watch the video Forensic Science Gunpowder Residue (7:42).
Open Forensic Science Gunpowder Residue (Freq Physics) in a new window
Note: The presentation may take a moment to load.
Knowledge Check #4
True or False: Gunshot residue is easily removed.
- True
- False
Answer: b. False
Knowledge Check #5
The machine used in this video is called an blank__________.
- chromatographer
- mass spectrometer
- ion beam accelerator
Answer: c. ion beam accelerator
Knowledge Check #6
The results of the experiment reveal _______blank.
- the ingredients and amounts in the sample
- the color of the ingredients
- the speed at which the bullet was fired
Answer: a. the ingredients and amounts in the sample
Griess Test
The Griess Test is used to develop patterns of gunshot residue around a bullet hole. Photo paper is placed over a bullet hole and heated with an iron that contains a vinegar solution. The steam from the iron applies the vinegar solution to the paper and makes nitrites in the gunshot residue visible as an orange color. This is a non-destructive method.
Sodium Rhodizonate Test
A sodium rhodizonate test detects lead residues. The solution is sprayed in the suspected area and turns bright pink if lead residues are present. Further treatment with hydrochloric acid confirms the presence of lead by turning blue.
Example Gunshot Residue Tests
Open Gunshot Residue Analysis and scroll to the sentence that reads, "Below are sample chemical test results"followed by 3 example images. In that example, nitrites are detected in the middle image using the Griess Test. Lead is detected in the image on the right using sodium rhodizonate.
Once these patterns have been visualized using the Griess and sodium rhodizonate tests, they are compared to patterns created when the same weapon is test fired at known distances. A positive match can help indicate the distance between the muzzle and the target.