Task
Gel Electrophoresis Virtual Lab
Section 1: The Scenario
The Crime
Devin Smith was returning from a late dinner. On his way home, he stopped at a convenience store to buy a pack of gum. As Devin exited the store the store, a tall man in a dark hoodie approached him and demanded his wallet. After Devin handed it over, the man punched him. Devin fought back but was knocked to the ground and further beaten before convenience store staff scared the assailant off.

The Evidence
Police have three main sources of evidence.
Victim Devin Smith
Police questioned Devin about the crime at the station.
Devin recalls: "It was dark and everything happened so fast. He was wearing a hoodie. All I know is that he was white and much taller than me, probably 4 or 5 inches taller. I'm sorry. That's all I saw."

Video
The police reviewed the cameras at the convenience store. While they did not offer a clear view of the attack, they identified two separate customers wearing dark hoodies who were in the store at about the same time as Devin. Both were white and between 6'0" and 6'2".

DNA
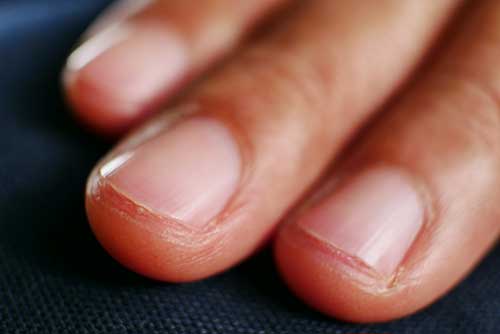
While Devin was being questioned, he mentioned that he had scratched his assailant. Forensics experts were able to recover blood and skin samples from his fingernails.
The Suspects
Using credit card and license plate information from the convenience store, police identified two potential suspects for the attack. They brought both suspects in for questioning.
Suspect 1: Eric Wayne Johnson
Eric comments: "I don't know what you are talking about. I just bought some cigarettes. Those scratches on my arm? I'm working landscaping. I get scratched all the time."

Suspect 2: Robert Earl Mitchum
Robert comments: "Man, I didn't attack anyone. Can't I just get some gum? The scratches on my face? I got a crazy cat. He caught me this morning."

The Forensic Lab
You are a lab technician at the forensic lab. You have received the blood and skin samples collected by the police. The samples are small, so you only have a small amount of DNA to work with.
Your objective is to use DNA analysis to see if either Eric Wayne Johnson or Robert Earl Mitchum are Devin's assailant.
Section 2: Background
The Science
Before you can begin your testing, let's make sure you understand the science behind the two procedures you will use to analyze DNA - polymerase chain reaction and gel electrophoresis.
DNA Fingerprinting
Our DNA is 99.9% similar to the people around us. However, even with that similarity, there are a few differences between people. These small differences ensure that all humans (except identical twins) have slight differences in their DNA, allowing each person to have a different DNA fingerprint.
Here are illustrations of how DNA can differ between people:
- Single pairs of DNA: Notice that in this pair, the DNA pair is swapped. The top is AT, and the bottom is TA.
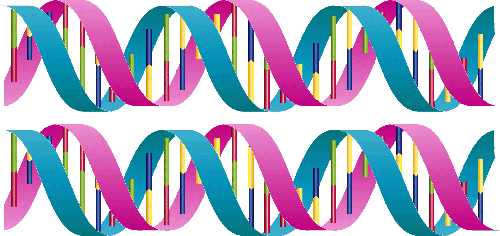
- Insertions of DNA: The top strand of DNA has one AT (blue-yellow) pair. The bottom strand has a duplicate of that pair in the same section of that sequence.
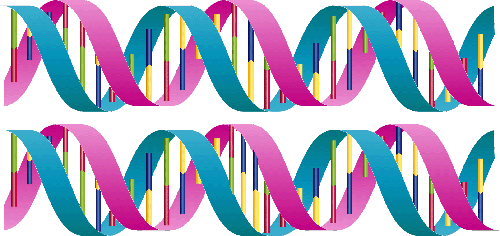
- Deletions of DNA: This strand of DNA is missing the last nine DNA pairs.
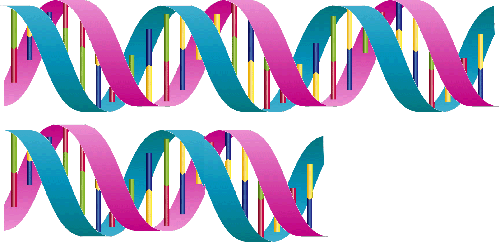
- Duplication of DNA: Notice that the final sequence of DNA is repeated in the bottom strand.

Polymerase Chain Reaction - Definition
Because you only have a small amount of DNA to work with, you will need to use PCR to copy the evidence. PCR, or polymerase chain reaction, is a process that allows the copying of small, select strands of a DNA.
Polymerase Chain Reaction - Process
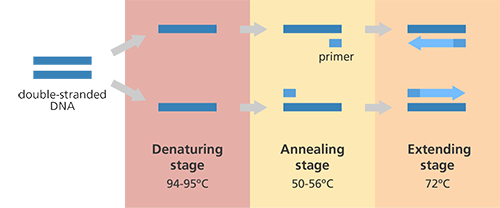
During the polymerase chain reaction process:
- Denaturing: DNA is heated until the two strands unzip and seperate.
- Annealing: Then, the DNA is cooled and short primer sequences of DNA attach to each of the DNA strands.
- Extending: The DNA polymerase enzyme attaches to the primer sequences and makes copies of the DNA.
- Repeat: The process of heating, cooling, and copying repeats until enough DNA is copied for the necessary tests.
Polymerase Chain Reaction - Lengths
Because of small differences in DNA sequences between individuals, the DNA produced through PCR will have varying lengths between individuals. Scientists can use these segments of different lengths to create a DNA fingerprint.
Steps of PCR
Watch the video Polymerase Chain Reaction (PCR). Open PCR video transcript
Open Polymerase Chain Reaction (PCR) in a new tab
"Polymerase Chain Reaction (PCR)" from HHMI BioInteractive is licensed under CC BY-NC-SA 4.0.
Knowledge Check #1
Put the steps for PCR in the correct order.
- The DNA is cooled and short primer sequences of DNA attach to each of the DNA strands.
- DNA is heated until the two strands unzip and seperate.
- The process of heating, cooling, and copying repeats until enough DNA is copied for the necessary tests.
- The DNA polymerase enzyme attaches to the primer sequences and makes copies of the DNA.
Answers:
- DNA is heated until the two strands unzip and seperate.
- The DNA is cooled and short primer sequences of DNA attach to each of the DNA strands.
- The DNA polymerase enzyme attaches to the primer sequences and makes copies of the DNA.
- The process of heating, cooling, and copying repeats until enough DNA is copied for the necessary tests.
Knowledge Check #2
After one round of PCR, there are two copies of the targeted DNA sequence. After two rounds, there are four copies. How many copies of the targeted DNA sequence should be present after five rounds of PCR?
- 5
- 10
- 32
- 1,000,000,000
Answer: c. 32
PCR Reflection #1
When PCR is used to amplify the same region of DNA in different people, why are the sizes of the DNA fragments different?
Answer: At some locations, individuals' DNA differs. The differences can be in single pairs of DNA or in the insertion, deletion, or duplication of DNA sequences.
PCR Reflection #2
How is PCR useful in forensic science?
Answer: PCR allows us to take small amounts of evidence and copy it several times for analysis. PCR also allows us to create DNA fragments of different lengths to help us distinguish between individuals.
Gel Electrophoresis
After PCR, we have billions of DNA fragments. We can separate these DNA fragments by size using a process called gel electrophoresis. Click on each tab below to learn more.
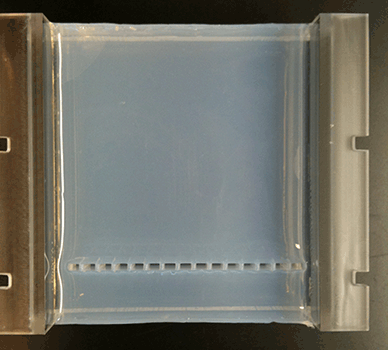
Step 1
A gel made of agarose is set with wells for DNA samples. A solution is poured over the gel.
Step 2
The DNA is mixed with a dye and injected into the well. Each sample is added to its own well. The dye does not color the DNA; it simply allows use to track the DNA's progress through the gel.
Step 3
An electric current is applied to the gel. Because the DNA fragments have a slight negative charge, they will start to move towards the positive charge on the other side of the gel. The DNA fragments will move at different speeds depending on their shape and size. Larger molecules will take a longer time to work their way through the gel than smaller molecules.

Step 4
You can track the progress of the electrophoresis by looking at the location of the farthest blue bands.
Step 5
Once the dye has reached the opposite end of the gel, the electrophoresis is complete. The electric current is stopped and the gel is dyed to reveal the DNA banding pattern.
Gel Electrophoresis Animation
Watch the video Electrophoresis and Gel Analysis.
Open Electrophoresis and Gel Analysis in a new tab
Electrophoresis and Gel Analysis downloaded from PBS LearningMedia. Rights to use this asset do not expire. Asset Copyright: © 2011 WGBH Educational Foundation. All Rights Reserved. Media Credits: Animation by Digizyme Inc., www.digizyme.com. Created with Molecular Maya (mMaya) by Yan Liang, Evan Ingersoll, Campbell Strong, Jeannie Park, and Gaël McGill. Source: Produced by WGBH and Digizyme, Inc. Project funded by: Amgen Foundation. See full license here.
Gel Electrophoresis Example
Look at the DNA fingerprint created through gel electrophoresis.

PCR Reflection #3
What characteristic of the DNA molecule allows us to separate DNA molecules by size?
Answer: The negative charge on the DNA molecules allows us to use the electric current to separate the DNA molecules.
Section 3: The Lab Process
The Equipment
You have taken the sample and run it through 30 PCR cycles. Now it is time to set up the gel electrophoresis.

Here's a breakdown of the equipment and its functions:
- Gel box and agarose gel: This contains the agarose gel that will be used to separate the DNA fragments.
- Electrodes: The electrodes will connect the power supply to the gel, allowing a current to flow through it.
- Syringe: The syringe allows us to measure and inject the samples into the gel.
- Tip: We use disposable tips to transfer the DNA and avoid cross-contamination of samples.
- Power supply: The power supply provides the electric current that will drive the movement of the DNA fragments.
- DNA samples: We have DNA samples from the victim, suspects, and evidence. It has already been mixed with the tracking dye
- Wires: The wires connect the power supply to the electrodes.
- Buffer solution: The buffer solution covers the agarose gel. It has a special balance of ions to allow DNA movement.
- Stain: After the gel is run, we will use a stain to make the DNA bands more visible.
Loading the Gel
Now that the set-up is complete, you can load the gels. You need to change the disposable tips after each sample.
Why? Answer: We change the tips to avoid any possibility of cross-contamination. This would invalidate our evidence.
Watch the video Loading the Gel.
Open Loading the Gel in a new tab
Running the Gel
Now that the gel is loaded, you may connect the electrodes and run the gel.
Why is this important? Answer: We are taking advantage of the negative charge of the DNA to move it through the gel. In order to move it, we need to create an electric field. The power supply and electrodes do this.
Watch the video Running the Gel.
Open Running the Gel in a new tab
Staining the Gel
Now that the gel is loaded, you may connect the electrodes and run the gel.
Why do we stain the gel? Answer: We are taking advantage of the negative charge of the DNA to move it through the gel. In order to move it, we need to create an electric field. The power supply and electrodes do this.
Watch the video Staining the Gel.
Open Staining the Gel in a new tab
Viewing the Bands
It takes time for the stain to migrate through the gel and bind to the DNA. After the gel has developed, you see the pattern below.
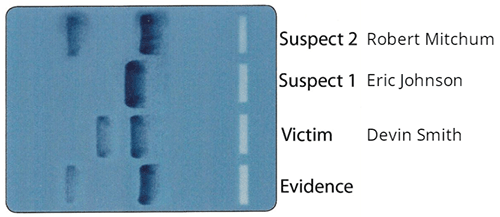
Section 4: Analysis
Analysis of DNA
After PCR and gel electrophoresis, we have the evidence below. Remember, the evidence was retrieved from under the victim's fingernails. As you review the evidence, think about the following:
- Compare the pattern of the evidence DNA with the suspect DNA. Which suspect's DNA matches the evidence DNA?
- Compare the pattern of the evidence DNA with the victim DNA. Is the evidence DNA contaminated with the victim DNA?
Conclusion
Based on the evidence, is either suspect tied to Devin's assault? Complete your lab report based on the evidence provided. Use specific information from this activity to support your conclusions.