Task
Scenario
The Crime
Sonia is a civil litigation attorney. Her law firm keeps physical evidence files and case documentation in their office, which was broken into last night.
The burglars went through Sonia's desk, and several files pertaining to a pending case were stolen.
The Victim
Sonia noticed several folders left open on her desk and important files and evidence removed. Office supplies, including an ink pad used for filing, were strewn across the office.
Sonia showed these to the police, as well as a coffee cup and spoon she had left on her desk that had been thrown to the floor.
The Evidence
The police found several surfaces in the office that they hope will yield fingerprint evidence, including the glass top of Sonia's desk, several papers and files, and the coffee mug and spoon from the floor.
The smaller, more portable items have been brought to the lab for testing, along with print specimens recovered from furniture and other large surfaces.
The Suspects
All the files stolen deal with a case Sonia's firm will be bringing to court soon, so the police are looking at several suspects who would benefit from the opposing party winning this suit. These potential suspects have each been asked to provide a set of fingerprints for comparison to any that can be recovered from the scene. Sonia has also been fingerprinted.
Watch the video Sample Prints to see how the prints were collected. (Please Note: There is no audio.)
Open Sample Prints in a new window
Note: The presentation may take a moment to load.
The Forensic Lab
With the fingerprint evidence collected in the forensic lab, the fingerprint analyst must use several processes to enhance and examine the prints. Once the prints have been rendered visible through these processes, the analyst must compare the prints from the crime scene to those provided by the suspects.
The characteristics of human fingerprints will help the analyst find points of comparison to determine whether any prints are potential matches.
Background
The Science
Fingerprints are used in criminal investigations because of the three fundamental principles of fingerprints:
- A fingerprint is an individual characteristic.
- A fingerprint will remain unchanged during an individual's lifetime.
- Fingerprints have general characteristic ridge patterns that permit them to be systematically classified.
In order to match two fingerprints, a fingerprint analyst must compare the ridge characteristics. If between 10 and 16 specific points of reference compare identically between the two, a match is validated.
Loops, Whorls, Arches
The three specific classes for all fingerprints is based upon the general visual patterns of loops, whorls, and arches. Roughly 60% of the total population have loops, 35% have whorls, and 5% have arches. The three major groups are also subcategorized based upon smaller differences existing between the patterns within a specific group.
| Arch | Loop | Whorl |
|---|---|---|
| Plain Arch | Ulnar Loop | Plain Whorl |
| Tented Arch | Radial Loop | Double Loop Whorl |
| Central Pocket Loop Whorl | ||
| Accidental Whorl | ||
| Additional Distinguishing Characteristics: | ||
| Ridge line enters one side, exits opposite side | Must have one delta | Must have two deltas |
Eight Types of Fingerprint Patterns
These are examples of the eight types of fingerprints used for classification.
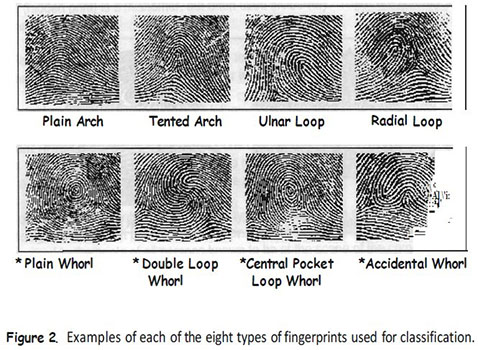
- Arches
- Of the two types of arches, the Plain Arch is the simplest of all fingerprint patterns. It is formed by ridges entering from one side of the print and exiting on the opposite side.
- The Tented Arch is similar, but instead of rising gradually to the center, there is a sharp central spike where the ridges meet at an angle that is nearly 90 degrees.
- Loops
- A loop must have one or more ridges entering from one side of the print, curving, and exiting from the same side. If a loop opens toward the little finger, it is called an Ulnar Loop. If it opens toward the thumb, it is called a Radial Loop.
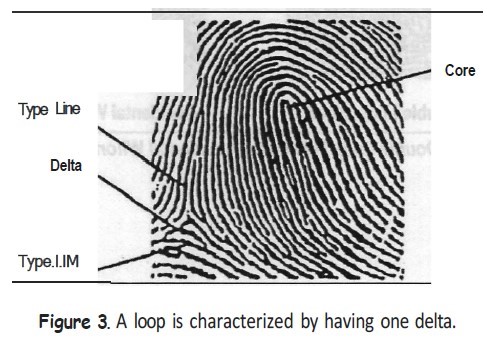
- Type Lines are two diverging ridges, usually coming into and splitting around an obstruction, such as a loop. A Delta is the ridge point nearest the type line divergence. A delta may be identified by a tri-shaped or Y-shaped meeting of ridges. The Core is the approximate center of the fingerprint pattern.
- All loops are characterized by having one delta. Arches do not have type lines, deltas, or cores.
- Whorls
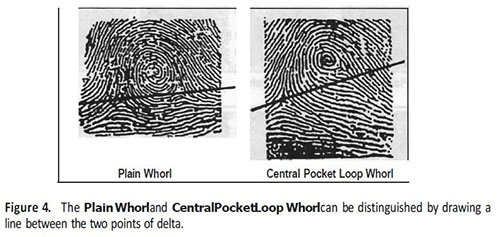
- Whorl patterns are characterized by having type lines and a minimum of two deltas. A Plain Whorl and Central Pocket Loop Whorl have at least one ridge that joins with itself to make a complete circuit. This joined ridge may form a spiral, an oval, or any other circular shape.
- The difference between these two patterns is demonstrated by drawing a line between the two deltas contained within each pattern. If the line touches any of the circular ridges in the pattern, the fingerprint is characterized as a plain whorl. If no ridges in the circular pattern are touched by the line, the pattern is characterized as a central pocket loop whorl.
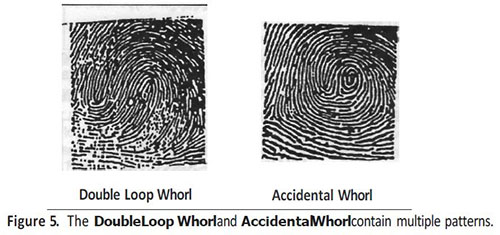
- Double Loop Whorls
- The Double Loop Whorl is made up of any two loops combined into one fingerprint. Any print classified as an Accidental Whorl either contains two or more patterns (excluding the plain arch) or has a pattern not described by another category, such as a combination of a loop and a plain whorl or a combination of a loop and a tented arch.
Direct or Inked
When the police or FBI book a person suspected of committing a crime, the suspect's fingerprints are taken and kept on file. These are direct or inked fingerprints, which are the impressions of the ridge detail of the individual's fingertips.
A set of prints can run through scanning devices and matched with a possible suspect within minutes.
Types of Prints
The term latent print (hidden print) is a misnomer, but often used inclusively. A misnomer is a name that is incorrectly or unsuitably applied. There are actually three kinds of crime scene prints. These are:
- Visible prints, which are prints made by fingers touching a surface after the ridges have been in contact with a colored material such as blood, paint, grease, or ink.
- Plastic prints, which are ridge impressions left on a soft material such as putty, wax, soap or dust.
- True latent prints are invisible print impressions caused by the perspiration on the ridges of one's skin coming in contact with a surface and making an invisible impression on it. Perspiration contains water, salt, amino acids, or oils and easily allows impressions to be made.
Prepping and Comparing Prints
The method used for obtaining latent prints depends on the type of surface to be examined, the manner in which the prints were left, and the quantity of material left behind.
After the prints have been photographed, lifted, and taken into the crime lab, they are then compared to the prints of all persons known to be at the scene of the crime or who had access to the crime scene. This procedure eliminates all but the criminal's prints.
Knowledge Check #1
Match the image of the fingerprint to the type of pattern it demonstrates.
Terms:


Definitions:
- Arches
- Loops
- Whorls
Answers:
- image 1: Whorl
- image 2: Arch
- image 3: Whorl
- image 4: Arch
- image 5: Loop
- image 6: Whorl
- image 7: Whorl
- image 8: Loop
Knowledge Check #2
This type of print is caused by perspiration on the ridges of the skin coming in contact with a surface.
- visible print
- latent print
- plastic print
- direct print
Answer: b. latent print
Link to Case
As a lab technician, your job is to obtain any fingerprints left on each of the items of evidence. You will use different methods to obtain fingerprints from different types of surfaces:
- Dusting with carbon powder on white or light colored surfaces.
- Dusting with lanconide powder for black surfaces.
- Dusting with aluminum powder for hard or dark colored surfaces as well as mirrors and metal surfaces.
- Use of iodine fuming techniques to develop a latent print on paper.
- Use of ninhydrin to develop a latent print on paper.
The Lab Process
The Methods
There are several methods for obtaining fingerprints. The method used depends on the type of surface to be examined, the way the prints were left, and quantity of material left behind.
The first step is to gather fingerprint samples from all the crime scenes.
Dusting for and Lifting Prints
The Equipment: For dusting and lifting fingerprints from a smooth, non-porous surface, you will need the equipment pictured.

- Small beakers
- Alumium dusting powder
- Magnifying glass
- Glass microscope slide with single thumbprint
- Dusting brush
You will also need:
- Cellophane tape
- Newspaper
- Index cards, cut into thirds
- Camera
Process Steps: Let's go over the steps in dusting for and lifting prints from a smooth, non-porous surface.
- After making sure the brush is clean and the bristle are separated, use the brush to apply powder to the fingerprint.
- Distribute the powder evenly over the surface that includes the print.
- Remove the excess powder by carefully blowing the dust from the surface or by gently brushing.
- Photograph the print.
- While leaving tape attached, unroll enough to cover the fingerprint.
- Press tape over the print and force out all air bubbles.
- Remove tape by pulling on roll end and place tape on fingerprint card.
- Remove tape from roll.
There are different kinds of dusting powders. The kind to use depends on the type of surface being examined. On a dark surface a white powder like laconide would be used. On a white surface it would be a black powder, such as carbon black. Aluminum powder can be used on either color, and is particularly useful on mirrors and metal surfaces.

Lab Part 1
Open Dusting Print in a new window
Note: The presentation may take a moment to load.
Lab Part 2
Open Lifting Print in a new window
Note: The presentation may take a moment to load.
Knowledge Check #3
Match the name of the lab equipment to the correct place on the image.
Terms:
- Item 1
- Item 2
- Item 3
- Item 4
- Item 5
Definitions:
- Small beaker
- Dusting brush
- Aluminum dusting powder
- Glass slide with print
- Magnifying glass
Answers:
- Item 1: Small beaker
- Item 2: Aluminum dusting powder
- Item 3: Magnifying glass
- Item 4: Glass slide with print
- Item 5: Dusting brush
Knowledge Check #4
Dusting and lifting is the method used for fingerprints found on what type of surface?
- Paper
- Smooth, porous
- Smooth, non-porous
- Rough, non-porous
Answer: c. Smooth, non-porous
Reflection
What do you think about the dusting and lifting process for obtaining fingerprints? Do you believe it would be a dependable way to identify suspects in a crime?

Using Ninhydrin to Develop a Print on Paper
The Equipment: For using ninhydrin to develop a print on paper, you will need the equipment pictured.

- Tweezers
- Brush or cotton balls
- Ninhydrin solution
- Magnifying glass
- Filter paper with single thumbprint
You will also need:
- Gloves
- Paper Towels
Process Steps: Let's go over the steps in using ninhydrin to develop a print on paper
- Tape the fingerprint exhibit to a paper towel
- Apply the ninhydrin solution
- Brush method: carefully and gently dab liquid over fingerprint; don't use too much pressure or you will destroy the print
- Cotton ball method: hold cotton ball with tweezers and dab with solution, using same caution
- Allow paper to dry, which may take up to 3 hours
Ninhydrin reacts with the amino acids in the perspiration left behind in the fingerprint. This reaction turns pink or purple.

Lab
Open Using Ninhydrin to Develop Prints in a new window
Note: The presentation may take a moment to load.
Knowledge Check #5
Match the name of the lab equipment to the correct place on the image.
Terms:
- Item 1
- Item 2
- Item 3
- Item 4
- Item 5
Definitions:
- Ninhydrin solution
- Brush or cotton balls
- Tweezers
- Filter paper with print
- Magnifying glass
Answers:
- Item 1: Tweezers
- Item 2: Brush or cotton balls
- Item 3: Ninhydrin solution
- Item 4: Magnifying glass
- Item 5: Filter paper with print
Knowledge Check #6
On what type of surface might ninhydrin be used to develop a fingerprint?
- Paper
- Smooth, porous
- Smooth, non-porous
- Rough, non-porous
Answer: a. Paper
Reflection
What do you think about using ninhydrin to develop a print on paper? Do you believe it would be a dependable way to identify suspects in a crime?
Using Iodine Fuming to Develop a Print on Paper
The Equipment: For using iodine fuming to develop a print on paper, you will need the equipment pictured.

- Gloves
- Bond paper with a single thumbprint
- Fuming jar
- Iodine solution
- Pipette
- Tweezers
- Cellophane tape
Process Steps: Let's go over the steps in using iodine fuming to develop a print on paper.
- After putting on your gloves and moving to the hood for safety, use a pipette to place 10 drops of iodine solution in the fuming jar.
- Cut a piece of tape about 1" long and place half of it on the paper containing your fingerprint.
- Open the jar containing the iodine solution and quickly tape the paper to the lid so that the paper hangs down inside the jar.
- Replace the lid and allow the iodine vapor to contact the paper for 3 to 5 minutes or until the print is visible.
- When you can see the developed print, use tweezers to remove the paper from the jar. Do not breathe iodine fumes. Quickly replace the lid on the jar.
The oil in the print absorbs the iodine vapor producing a violet to purple / brown fingerprint. However, it will not last; it will start to disappear soon, so you should take a picture of the print or chemically preserve it.
Lab Part 1
Open Using Iodine Fuming to Develop a Print: Preparation in a new window
Note: The presentation may take a moment to load.
Lab Part 2
Open Using Iodine Fuming to Develop a Print: Complete in a new window
Note: The presentation may take a moment to load.
Knowledge Check #7
Match the name of the lab equipment to the correct place on the image.
Terms:
- Item 1
- Item 2
- Item 3
- Item 4
- Item 5
- Item 6
- Item 7
Definitions:
- Cellophane tape
- Bond paper with a single thumbprint
- Tweezers
- Iodine solution
- Gloves
- Pipette
- Fuming jar
Answers:
- Item 1: Gloves
- Item 2: Bond paper with a single thumbprint
- Item 3: Fuming jar
- Item 4: Iodine solution
- Term5: Pipette
- Item 6: Tweezers
- Item 7: Cellophane tape
Knowledge Check #8
On what type of surface might iodine fuming be used to develop a fingerprint?
- Paper
- Smooth, porous
- Smooth, non-porous
- Rough, non-porous
Answer: a. Paper
Reflection
What do you think about using ninhydrin to develop a print on paper? Do you believe it would be a dependable way to identify suspects in a crime?

Identifying a Direct Print
Process
Sometimes a suspect will leave behind a print that is clearly visible. In these cases, the suspect had something on their hands that left the print. These substances could be things such as soot, ink, blood, paint, make-up, and dyes.
Usable direct prints could also be left because of the material a suspect touched at the scene, such as clay or window putty. In order to identify a direct print, use a magnifying glass to observe the print.

Open Identifying a Direct Print: Observing with a Magnifying Glass in a new window
Note: The presentation may take a moment to load.
Knowledge Check #9
Which of the following materials on a suspect's hands might leave a usable direct print?
- Ammonia
- Gasoline
- Blood
- Dog hair
Answer: c. Blood
Reflection
What do you think about identifying direct prints? How likely do you think it is that law enforcement finds direct prints when they inspect crime scenes?

The Evidence
Viewing the Evidence
Now you will observe the evidence from the crime scene and compare it with the samples from the suspects. Record your observations on your lab report.


Analysis and Conclusion
Finish your analysis of the fingerprint evidence by completing the task document for this lab.
Remember to complete your lab report! Your findings will be shared with law enforcement and used, in part, to resolve or move this case forward.